![abtrace-logo-colour@2x-3.png]](https://help.abtrace.co/hs-fs/hubfs/abtrace-logo-colour@2x-3.png?width=124&height=60&name=abtrace-logo-colour@2x-3.png)
Messages can be sent from:
- Patient View – contact an individual patient.
- Population View – contact multiple patients at once using batch messaging.
- Optimisation View – contact patients identified through optimisation opportunities.
You can send an appointment booking link, request information with a questionnaire, or send a standalone message. All messages are automatically recorded back into your clinical system.
👇To get started, watch the walkthrough video below below, work through the sections in order, or jump straight to what you need using the links below
Jump To:
📋 Recording Codes, Staff Notes and Patient Needs Summary
🎥 While this demo is shown in Patient View, the messaging functionality works in exactly the same way when sending messages from Patient View, Population View, or Optimisation View.
Sending a message
To send a message to an individual patient, open Patient View and select Message at the top of the page.
You can send an SMS or email, depending on the contact details held for the patient. Abtrace checks for dissent codes and will automatically disable any communication method that the patient has opted out of. Abtrace works on an implied consent basis, so only dissent codes are checked.
You can send a message on its own, or include an appointment booking link or questionnaire link. Simply enter your message, for example, “You are due a blood test appointment”, and then choose which additional options to include.
Once messages have been sent, a daily summary of messaging activity is shared through the Delivery Status Report. Click here to learn more about managing delivery status reports.
💡 Want to message multiple patients at once? You can also send batch messages from Population View. See Sending a batch message for more information.
Appointment Booking Link
An appointment booking link lets patients book directly into an appointment slot of their choosing. To add one, tick Include an appointment link, then set up what the patient can see:
- Appointment description — enter a clear, patient-facing description of the appointment.
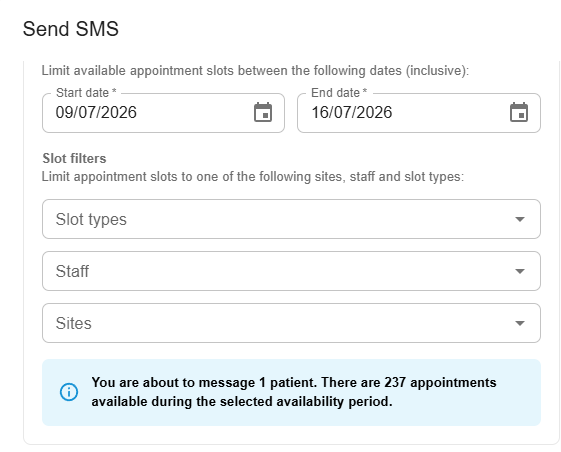
- Booking period — set the start and end dates using the calendar icon or date box. Patients can book appointments between these dates.
- Slot type — choose a single slot type pulled from your clinical system, or multiple slot types where appropriate.
- Staff member — filter to specific staff members if needed.
- Site — select from the available sites, based on the sites you have access to in your clinical system.
At least one option must be selected. Any single selection from staff member, or slot type - is sufficient.
If no slots are available when a patient tries to book, they’ll see one of two things:
- A default message explaining that no appointments are available and asking them to try again later or contact the practice, or
- An appointment request form that allows patients to share their availability and submit their request back to the practice for review and action.
📖 Want to learn more about appointment request forms? Read our Appointment Request Forms Guide here.
Patients can use an appointment booking links for up to 28 days. If you open appointments for a shorter period than this, patients will only be able to book within that corresponding timeframe.
Checking slot availability
When sending a message with an appointment booking link, either to an individual patient or as part of an automated recall, Abtrace displays a live count of available appointment slots for the selected booking period. This updates as you configure the message, helping you check appointment capacity before booking links are sent to patients.
Please note, messages will still send even if there is no appointment availability, so it is important to review slot availability before sending.
💡 Top tip: If appointment availability is limited, try expanding the booking period (for example, from 28 days to 42 days) to include more available slots before sending booking links.
Questionnaire Link
You can request information from patients by including a questionnaire. Write your message, for example, “Please send us a recent blood pressure reading.” then tick Include a questionnaire and choose the appropriate questionnaire from the dropdown, such as Blood Pressure, to attach it to the message.
Questionnaires are only shown if the patient matches a clinical rule that has an associated questionnaire enabled for your organisation.
📖 Want to learn more about questionnaires? Read our Questionnaire Guide here.
Recording Codes, Staff Notes and Patient Needs Summary
All messages sent through the tool are automatically saved to the patient’s record. You can choose to record the message in the clinical system either as free text or as an attachment.
Attaching codes: you can add SNOMED codes that are saved to the patient’s record when the message is sent. Use the dropdown to search for a relevant code and apply it. You'll find the QOF codes by searching for "Quality and Outcomes Framework".
Staff note: you can attach a staff note as a final step. This appears below the message in the patient record and can hold helpful internal information for staff, for example if the patient later contacts the surgery. This note is also carried through to the appointment booking notes when the patient books an appointment using the link. The staff note is not sent to the patient.
Patient Needs Summary: You can include a Patient Needs Summary, which provides an overview of the patient’s overdue and opportunistic tasks. This information is saved to the patient’s notes but is not sent to the patient.